UPDATE: As of October 18, 2022, with release 2.5.0, this can all be done within Talkatoo.
With our new update, we have added the ability to adjust the microphone input volume within Talkatoo itself, from the settings menu. In addition to that, the default is set to automatically adjust, so for the vast majority of users, you will not need to do anything at all with this setting.
If you previously had configured it on this computer, you still don't need to do anything.
If you do not see this option in your settings page, check the version by going to Support, and if it's older than 2.5.0, click Check for Updates, or just quit and relaunch Talkatoo to update.
Setting the Volume Manually
If for any reason you do need to adjust the volume manually, you can uncheck Automatically adjust microphone volume.
Once you do so, you can set the volume to a level that works for you, keeping in mind that the colored bar that registers while speaking should not go above green under normal circumstances.
Note that when the box is checked, the slider is greyed out, and is not necessarily representative of the level.
------------
Windows
Mac
This video demonstrates how to set up and troubleshoot microphone levels for the best dictation results with Talkatoo in Windows.
Higher means a more sensitive microphone. For a noise-cancelling microphone set your volume around 30-50. For a built-in computer microphone set the volume to around 70.
These are initial settings, and the optimal setting will depend on your voice and your environment. If you're using the Philips SpeechMike, or another really high quality noise cancelling microphone, and have a lot of background noise, especially people speaking, try setting the level at 30 and adjust up or down as needed.
Even if there is not a lot of background noise, in some cases, depending on your individual voice, and environment, we find that 50 is too high and lowering it to 30 provides much more accurate results.
Windows
- Click Start, and type Control Panel, and select when it's listed,
- If you'd prefer, there is a shortcut to skip these first 3 steps: click Start and type mmsys.cpl, then press Enter.
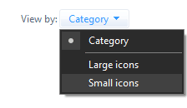
- Change view to show icons if it is currently displaying Category (top right)
- Double click Sound
- Click the Recording tab
- Double Click the microphone you are using
- Click the Levels tab and adjust the slider as needed.
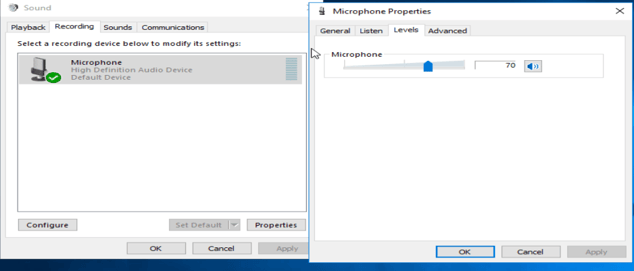
- Ensure that the microphone is not muted. It will show a red line on the speaker. Click to unmute.

Mac
-
On your Mac, choose Apple menu
 > System Preferences, click Sound, then click Input.
 -
Select the device you want to use in the list of sound input devices.
- Adjust the input volume by dragging the volume slider.